Constructing a tobacco pipe is undoubtedly a very complex operation, which requires a certain amount of scrupulousness, especially in certain stages, where the smallest of errors can irreparably ruin the process, ending up with the tobacco pipe being discarded.
In addition to this, specific machinery, such as a lathe, is needed to do a precise and quality job without great difficulty.
Let's see together how to make a tobacco pipe!
Preparing the briar block
Once the briar block has been extracted, it is best to prevent it from being in contact with dry air and sunlight: the important thing is that it should always be moist.
For this purpose, companies tend to cover the logs with soil or wet jute bags.
When well moistened, the log should be cleaned and cleared of any foreign elements, such as soil.
At this point, the heart of the briar, which is unusable, must be removed: from this point the actual preparation of the briar block begins.
Each half of the log should be cut with the circular saw, so as to obtain the "sketches," that is, small pieces of wood, each of which will give rise to the tobacco pipe heads.
We can consider 3 types of cutting the sketches, which determine different categories of quality and size.
For example, one of these is the very rare "plates," in which the outer bark of the briar is retained, resulting in large-sized sketches.
These feature excellent quality grain, typical in freehand tobacco pipes, where the rim of the stove is made from the peel of the log itself.
The other two types of bark are "marseillais," for the production of straight pipes, and "embossed," used for curved pipes.
That of preparing the briar block is a fundamentally important step, because the more you take advantage of the quality of the briar, the more beautiful the tobacco pipe will be, perhaps if it is enriched with large veins.
Once the sketches are grouped together, clearly according to type, they should be boiled in a copper cauldron in the heat of the fire, in order to remove the sap from the wood, which could generate cracks during drying, but also to give it a darker hue.
The sketches should be boiled for six hours, and then left for another twelve hours, but with the fire off.
After that, they are left to dry at room temperature for at least a month.
At this stage, some sketches are likely to have cracked, so they should be removed, but beware: getting perfect sketches is very difficult, so don't worry about keeping those with minimal defects, because they will not compress the quality of the tobacco pipe, or, at most, they can be corrected during manufacture.
Now that the sketches are ready, we move on to briar seasoning, which can be natural or artificial.
Natural seasoning lasts from four to six months and involves arranging the sketches on trellises in the open air, to be turned at regular intervals.
This type of seasoning ensures that all the qualities of the wood are maintained, otherwise artificial seasoning is opted for.
The artificial system consists of subjecting the sketches to a continuous cycle of hot air.
In this case, four to five weeks are sufficient, without the need for maintenance, since the sketches must be left inside the bags of origin.
Even after curing, there is a risk of the sketches cracking during drying and, clearly, they should be discarded.
Now, the actual making of the pipe begins.
Tobacco pipe carving
From this point on, the sketch gradually sheds its original "skin" and begins to take on shape and decorum, following a series of operations.
First, we have a phase of "rectification", in which the planes and corners of the sketch are finished by means of the circular saw, so as to obtain the desired volume.
At this point, the "countersink" comes into play, which gives rise to the stove: the sketch is rotated in front of a lathe, which shapes the hearth and the top of the stove.
Then, the sketch part from which the torch will be born is turned against a steel planer equipped with blades, which goes to shape the shank, giving it the desired shape, so oval or round, long or short.
Once the shank is made, head finishing is carried out.
Through milling, the part of the head, called the "bottom of the pot," is freed, employing a special machine that makes the shape of the intended pattern.
Considering that the milling machine does not reach the corners under the head, another step, rasping, is necessary, using a file.
Drilling the tobacco pipe
Now, we come to the most delicate stage of the entire tobacco pipe construction: the piercing of the shank.
This is done by holding the stove with jaws in a boxwood form, while the shank is brought closer to the tip of a drill.
The tip must be constantly greased and peeking down and into the center of the hearth.
Even the smallest error in terms of centering can irreparably ruin the tobacco pipe, causing puff problems.
This done, the tobacco pipe head is almost ready, but it is easy for defects to become apparent in the wood due to the previous operations.
Thus, further sorting may be necessary.
To remedy small imperfections in the wood, cracks and holes, grouting is done.
The flaws must first be brought to light with the gouge, and then covered with mastic made from isinglass and alabaster powder, through a spatula.
The walls of the briar will still not be perfectly even, so it will be necessary to remove the "fluff" of the briar with waxing: a felt pad soaked in oil and smeared with police is taken to press it into the hearth.
Finally, you make the second perforation of the shank, with which you obtain the space necessary to accommodate the mouthpiece graft.
At this point you go to assemble the tobacco pipe, then to join the shank and the mouthpiece, going to touch up the mouthpiece so that it fits the reed perfectly, using the lathe.
Threading will also be necessary: a small blade comb is turned, digging out the screw pitch that will accommodate the head and mouthpiece.
Still through the lathe, using a small disk coated with sandpaper, the finishing is done, which allows the perfect alignment between mouthpiece and shank.
Tobacco Pipe sanding
Another very delicate operation of tobacco pipe construction, which comes immediately after the above, is that of sanding, which eliminates imperfections due to machinery and excess mastic in the head and mouthpiece.
To carry it out, on the lathe, you pass the tobacco pipe with increasingly thin sandpaper.
This is a stage where great care must be taken, as there is a risk of altering the shape of the tobacco pipe.
For example, too much contact with the lathe would risk flattening a curve of the tobacco pipe, irreparably impairing it.
Once the sanding is finished, the tobacco pipe is almost ready.
Finishing the tobacco pipe
This brings us to the last stage in the production of a pipe: its finishing.
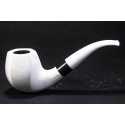
It is undoubtedly the case that first-rate tobacco pipes remain natural, or perhaps by being lightly polished with special oils.
At this stage, dyeing is also carried out, if necessary.
Any shade can be chosen, but there is no doubt that the darker ones make it possible to hide imperfections and fillings.
This is always done by hand, applying a mordant by pad or with the help of a brush, and then heating it slightly over fire in order to fix it.
Then, the tobacco pipe should be allowed to dry, hanging it, perhaps on racks with an infrared lamp.
Polishing is the next step: using felt rollers, any color runs are removed, making the dye uniform on the surface of the head
Once dyed and polished, you can move on to painting the tobacco pipe: again, great care must be taken.
In fact, the paint, as soon as it is applied, dries almost immediately, so it must be spread evenly over the head, always exerting the same pressure, in a single pass.
All it takes is one "shot" of paint and the tobacco pipe would be ruined.
In addition to this, care must be taken not to let the paint drip into the hearth, as it would make it infumable.
The whole thing looks very complicated, considering that the rim of the tobacco pipe also needs to be painted.
At this point, depending on the specific case, one moves on to sandblasting or rusticating.
In the case of sandblasting, the tobacco pipe is subjected to jets of sand and glass powder, which gnaw away at the softer parts of the briar, highlighting its hard fibers.
The sandblasting operation, however, is carried out inside a glass case, where you work through sleeves.
Otherwise, you risk invading your environment, as well as your lungs, with dust and sand.
Sandblasting has the advantage of recovering "defective" tobacco pipes, but it also makes for cooler smokes because of the reduced weight and uneven surface.
As for rustication, it is often done when the head has a large number of flaws.
A milling cutter is used to erase these imperfections, which sculpts the piece.
In doing so, the cracks and holes in the burl disappear from it.
This is a very complex operation, requiring patience and really painstaking carving work.
The final operation, performed on both natural and varnished tobacco pipes, consists of a final sanding, done very lightly with felt impregnated with appropriate cream or chamois leather.
Eventually, intubation, by which the mouthpiece is fixed, and insufflation, which removes all dust residue in the shank and mouthpiece with compressed air, can also be done.
Now, your tobacco pipe is finally ready!